VStack, HStack, ZStackを使った複数のViewのレイアウトについて解説します。
それぞれの基本的な配置の仕方やalignmentの種類について
実際のコードとプレビューした時の配置のされ方を交えながら
詳細に解説していきます。
・VStackの使い方
・HStackの使い方
・ZStackの使い方
・alignmentの種類と使用例
・複数のViewの組み合わせ方
・SwiftUIでのテキストの配置と書式の変更方法についてです。
【SwiftUI】テキストの配置と書式の変更について – アプリ開発
iOS/macOS UIフレームワーク SwiftUIプログラミング
1. 環境
今回紹介する内容で動作確認したXcodeとSwiftのVersionは以下になります。
【Swift】5.3.2
2. Stack Viewの基本
Stack ViewにはVStack,HStack, ZStackの3種類があります。
それぞれの特徴は以下になっており、GUIを構成するためには必須のViewとなるためしっかり使いこなせるようになりましょう。
【HStack】Viewを並行に並べる
【ZStack】Viewを重ねる
1. VStackの使い方
まず、子Viewを縦に配置する方法を説明します。
VStackの内部に”子View”を入れていきます。
VStack{
    子View1
    子View2
    子View3
    子View4
    ...
}
Viewの配置方法を調整したい場合は次のように書きます。
VStack(alignment: .leading){
    子View1
    子View2
    子View3
    子View4
    ...
}
ここでalignmentで配置方法を指定していますが、配置方法は次のようになります。
.center: 中央寄せ
.trailing: 右寄せ
実際にコーディングして確認します。
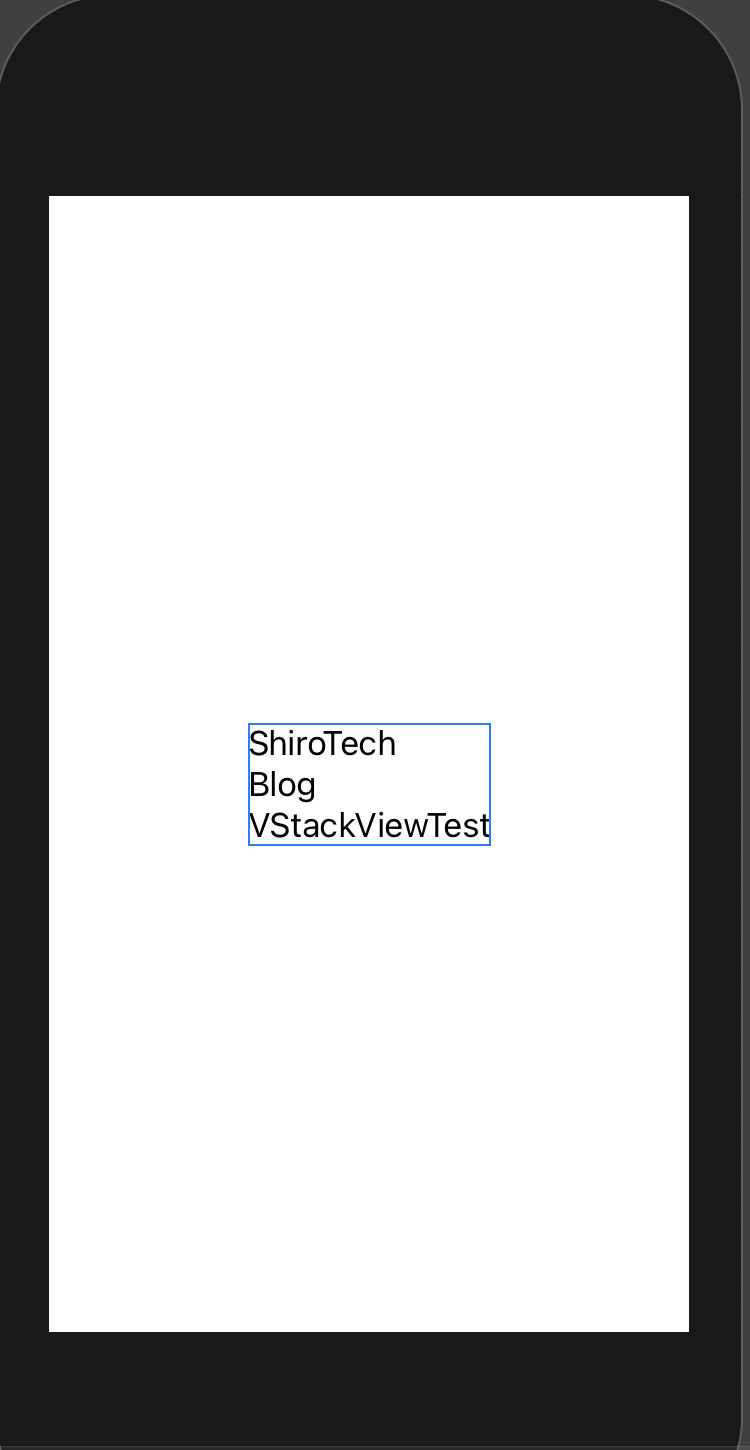
まず、Textを左寄せにして垂直に配置する場合は次のようになります。
import SwiftUI

struct ContentView: View {
    var body: some View {
        VStack(alignment: .leading) {
            Text("ShiroTech")
            Text("Blog")
            Text("VStackViewTest")
        }
    }
}
プレビュー画面は次のようになります。
先頭の文字が左で揃っています。
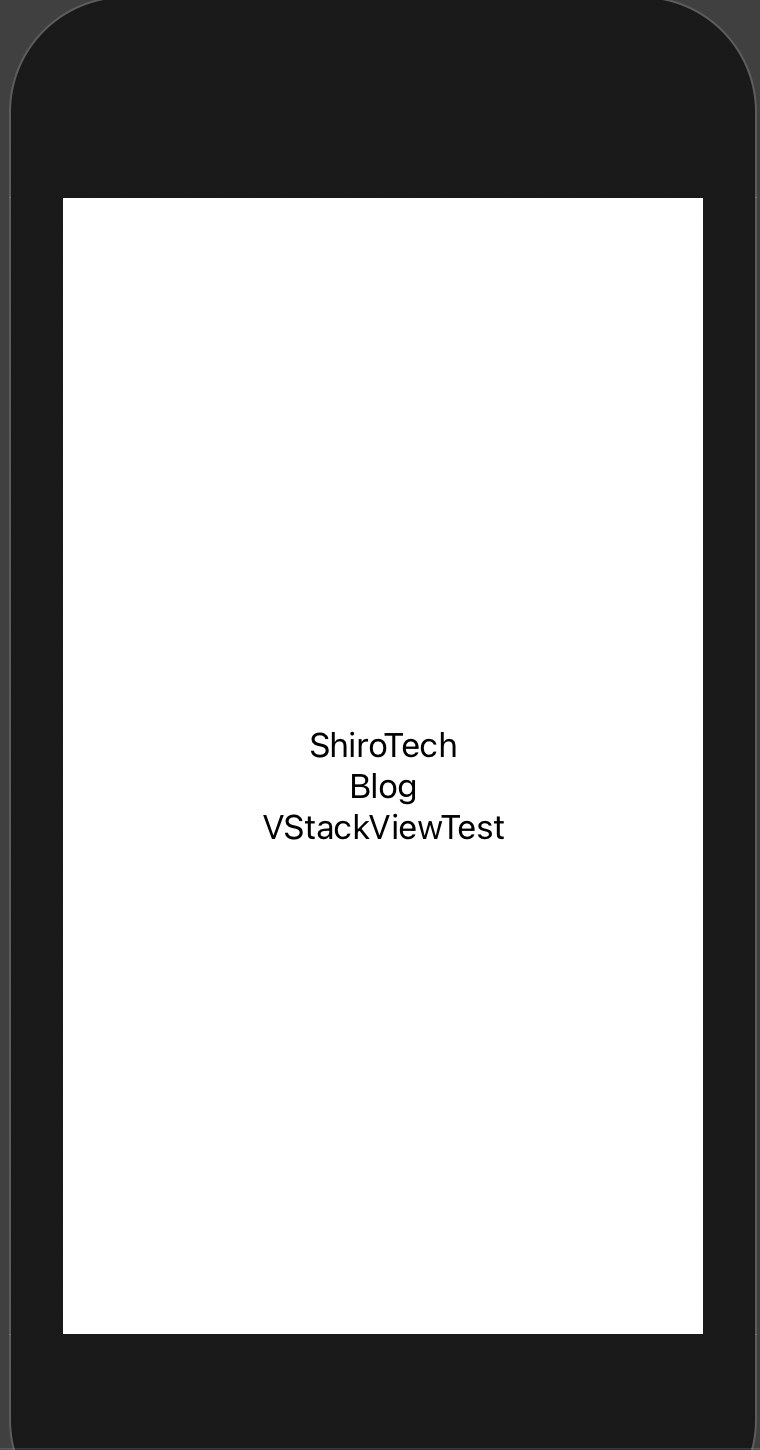
Textを中央寄せにして垂直に配置する場合は次のようになります。
import SwiftUI

struct ContentView: View {
    var body: some View {
        VStack(alignment: .center) {
            Text("ShiroTech")
            Text("Blog")
            Text("VStackViewTest")
        }
    }
}
プレビュー画面は次のようになります。
先頭の文字が中央で揃っています。
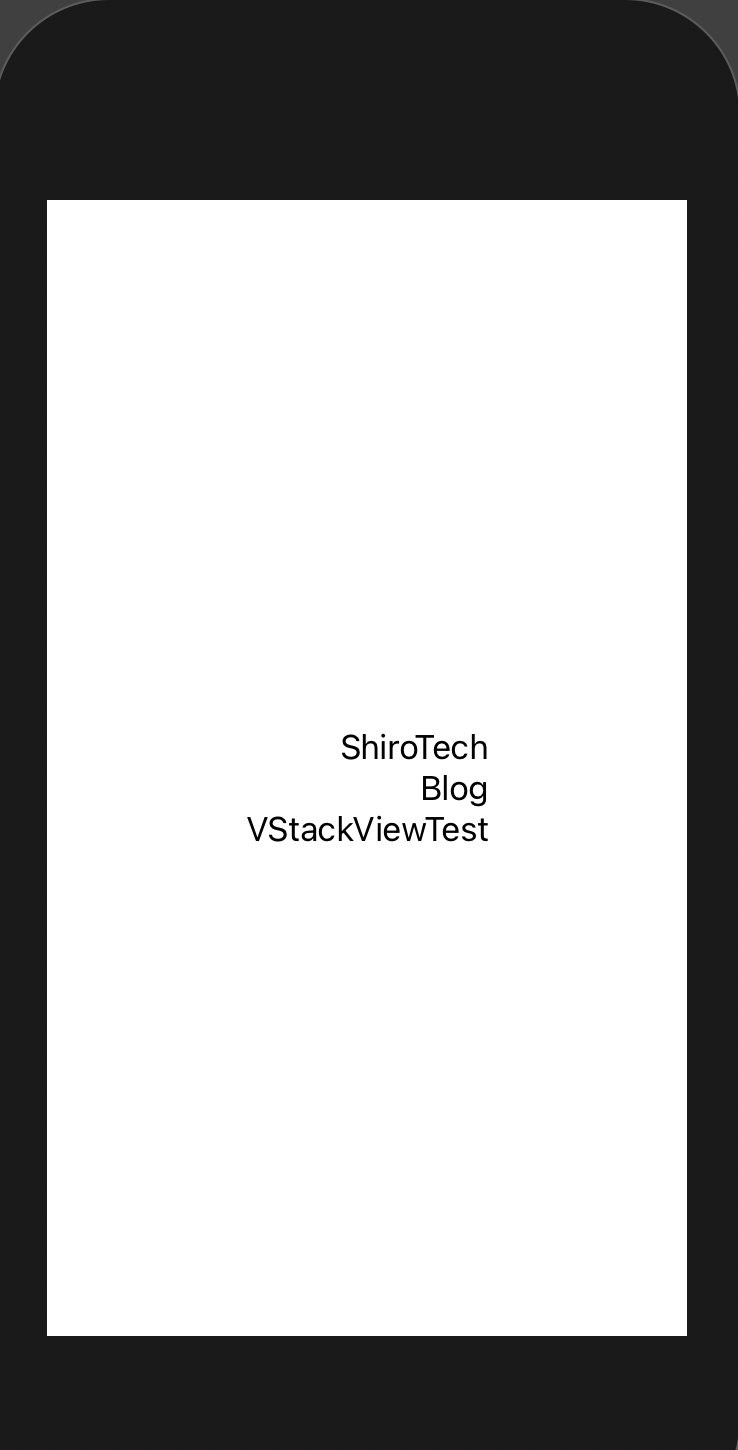
最後に、Textを右寄せにして垂直に配置する場合は次のようになります。
import SwiftUI

struct ContentView: View {
    var body: some View {
        VStack(alignment: .trailing) {
            Text("ShiroTech")
            Text("Blog")
            Text("VStackViewTest")
        }
    }
}
プレビュー画面は次のようになります。
先頭の文字が右寄せで揃っています。
2. HStackの使い方
子Viewを横に配置する方法を説明します。
VStackの時と同様に、HStackも子Viewを内部に配置していきます。
HStack{
    子View1
    子View2
    子View3
    子View4
    ...
}
Viewの配置方法を調整したい場合も同じように次のように書きます。
import SwiftUI struct ContentView: View {
     var body: some View {
         VStack(alignment: .center) {
             Text("ShiroTech")
             Text("Blog")
             Text("VStackViewTest")
         }
     }
}
alignmentでの指定方法はHStackの場合、次のようになります。
.center : 中央寄せ
.bottom : 下部寄せ
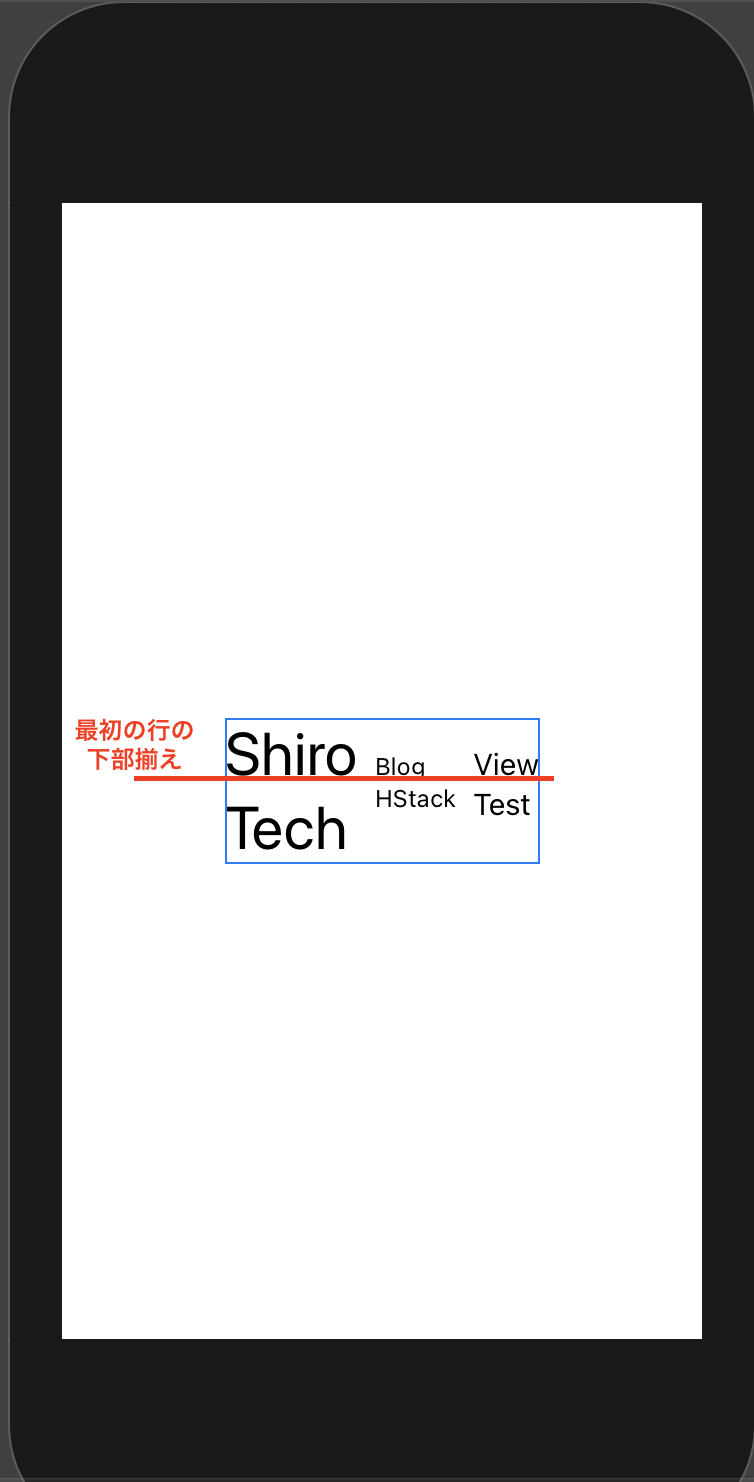
.firstTextBaseline: 1行目のテキストの下部を揃える
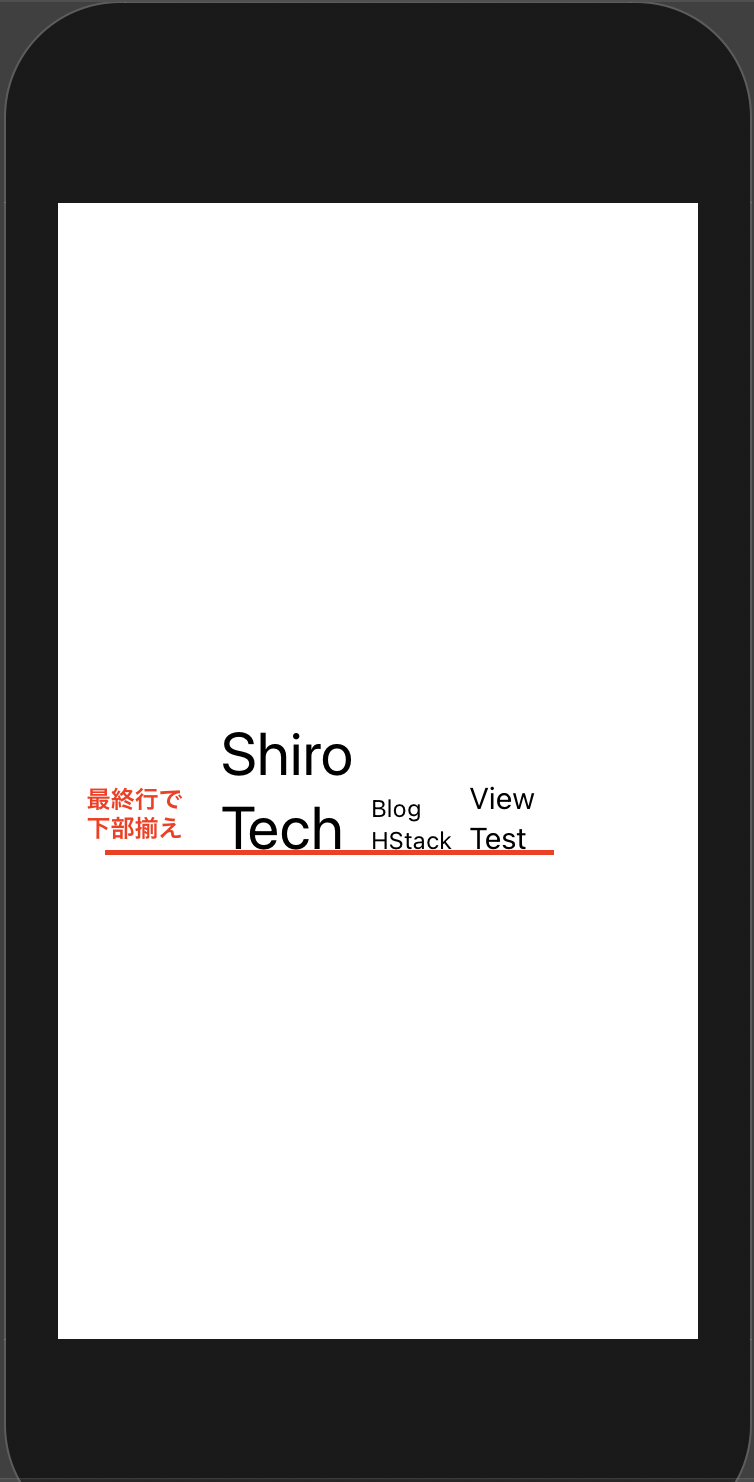
.lastTextBaseline: 最終行のテキストの下部を揃える
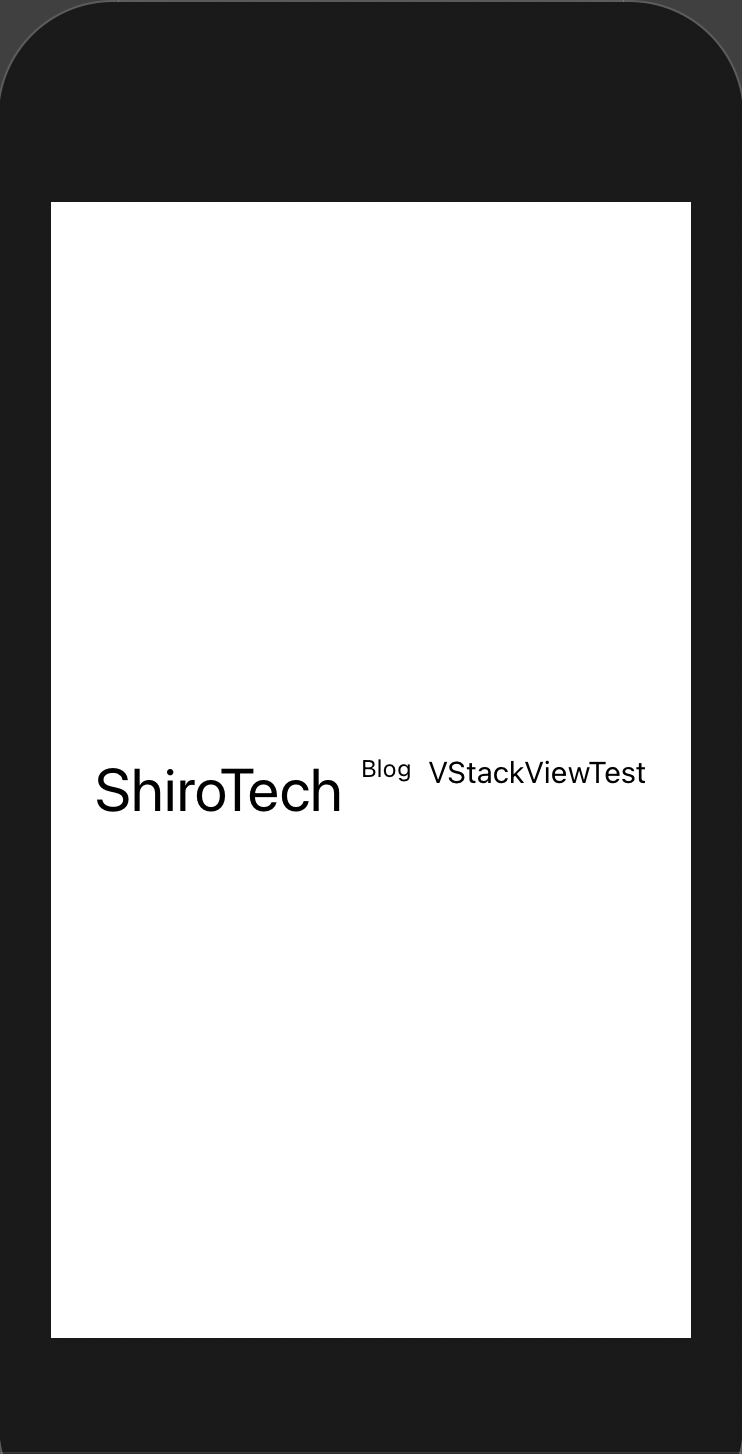
違いが分かるようにそれぞれのテキストのサイズはランダムに変更しています。
上部寄せの例です。
import SwiftUI

struct ContentView: View {
    var body: some View {
        HStack(alignment: .top) {
            Text("ShiroTech")
                .font(.largeTitle)
            Text("Blog")
                .font(.caption)
            Text("VStackViewTest")
                .font(.subheadline)
        }
    }
}
プレビューは次のようになります。
中央寄せの例です。
import SwiftUI

struct ContentView: View {
    var body: some View {
        HStack(alignment: .center) {
            Text("ShiroTech")
                .font(.largeTitle)
            Text("Blog")
                .font(.caption)
            Text("VStackViewTest")
                .font(.subheadline)
        }
    }
}
プレビューは次のようになります。
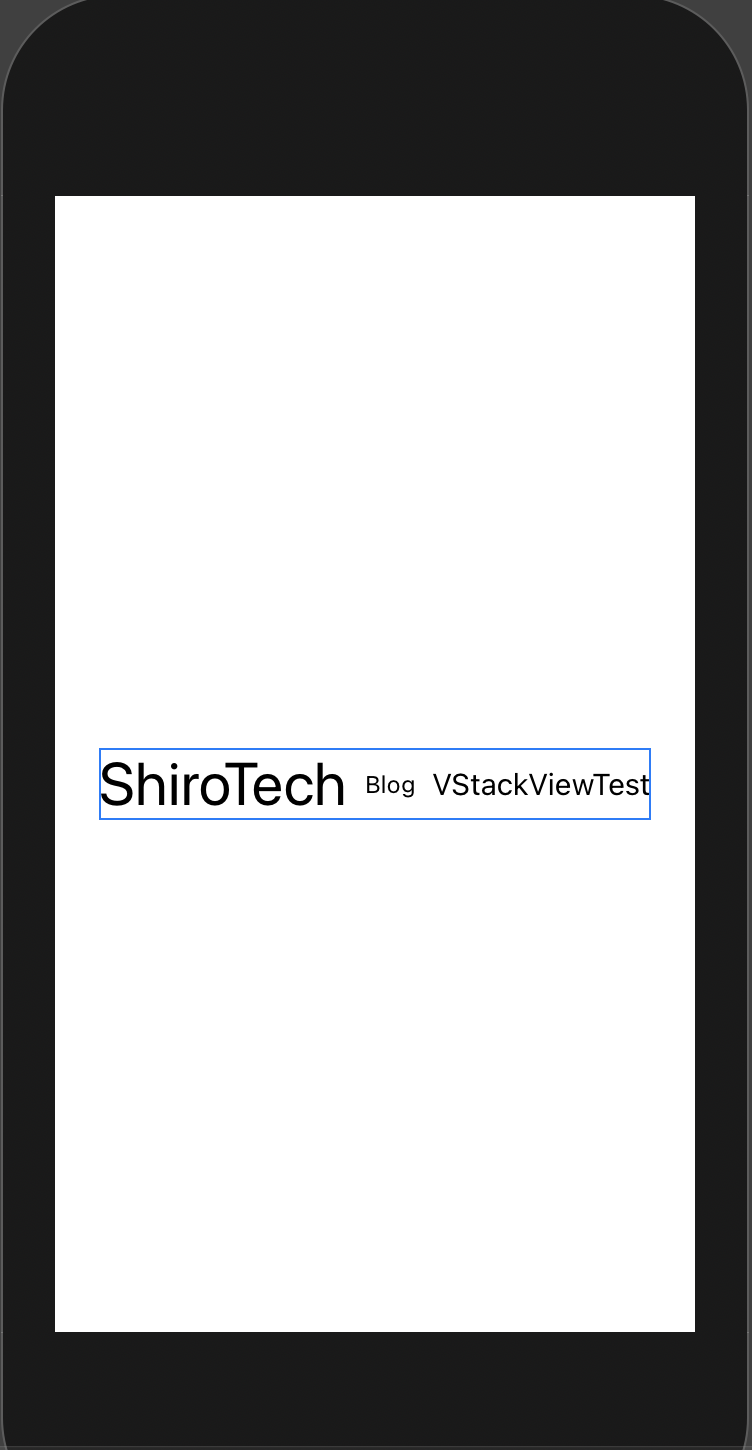
下部寄せの例です。
import SwiftUI

struct ContentView: View {
    var body: some View {
        HStack(alignment: .bottom) {
            Text("ShiroTech")
                .font(.largeTitle)
            Text("Blog")
                .font(.caption)
            Text("VStackViewTest")
                .font(.subheadline)
        }
    }
}
プレビューは次のようになります。
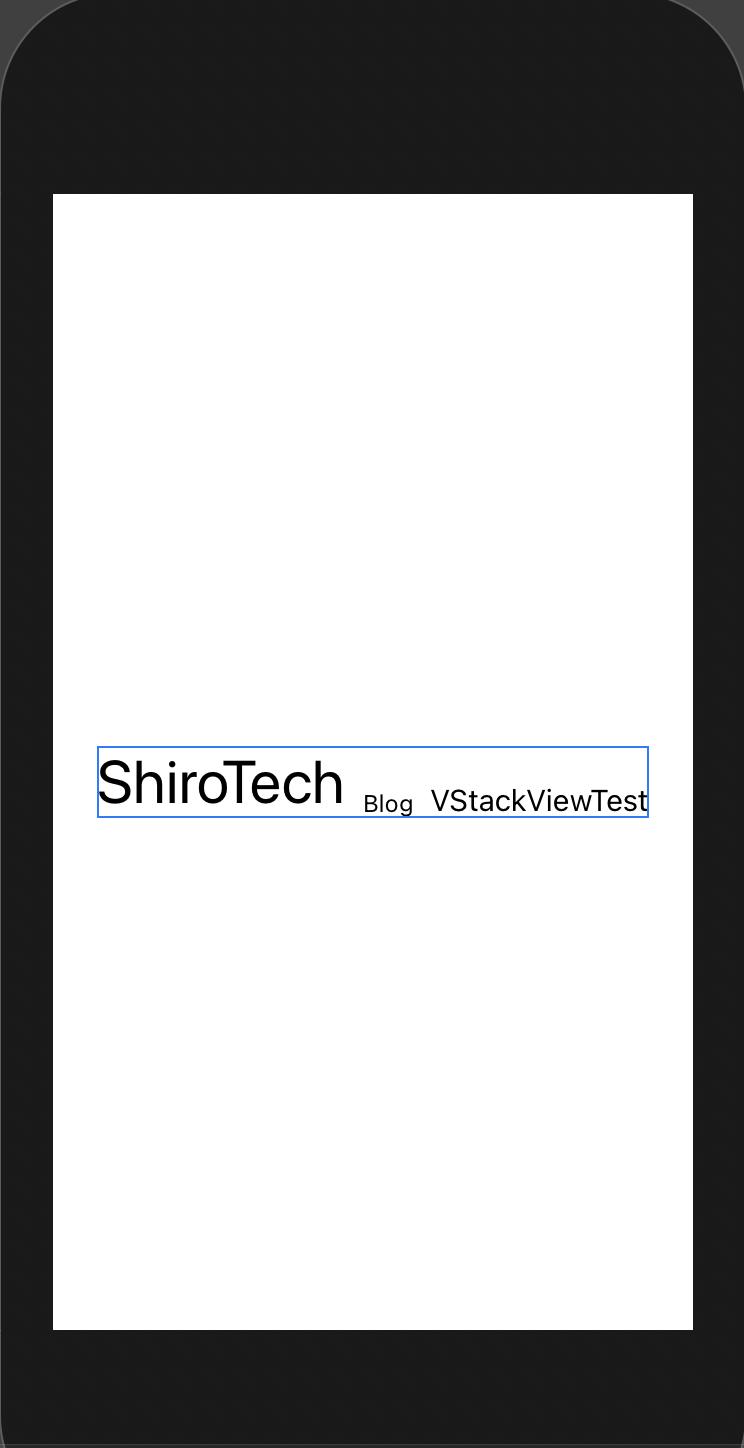
次は、.firstTextBaselineの例です。
違いが分かるようにテキストを2行にして配置します。
import SwiftUI

struct ContentView: View {
    var body: some View {
        HStack(alignment: .firstTextBaseline) {
            Text("Shiro\nTech")
                .font(.largeTitle)
            Text("Blog\nHStack")
                .font(.caption)
            Text("View\nTest")
                .font(.subheadline)
        }
    }
}
プレビューの結果は次のようになります。
最初の行の下部で、テキストが揃えられているのが分かりますね。
最後は、.lastTextBaselineの例です。
import SwiftUI

struct ContentView: View {
    var body: some View {
        HStack(alignment: .lastTextBaseline) {
            Text("Shiro\nTech")
                .font(.largeTitle)
            Text("Blog\nHStack")
                .font(.caption)
            Text("View\nTest")
                .font(.subheadline)
        }
    }
}
プレビューは次のようになります。
最終行で下部揃えとなっているのが分かりますね。
3. ZStackの使い方
基本的な使い方はVStackとHStackと同じですので省略します。
ZStackでの配置の指定の仕方は次のようなものがあります。
.topLeading : 左上部寄せ
.topTrailing : 右上部寄せ
.center : 中央寄せ
.bottom : 下部寄せ
.bottomLeading : 左下部寄せ
.bottomTrailing : 右下部寄せ
.leading : 左寄せ
.trailing : 右寄せ
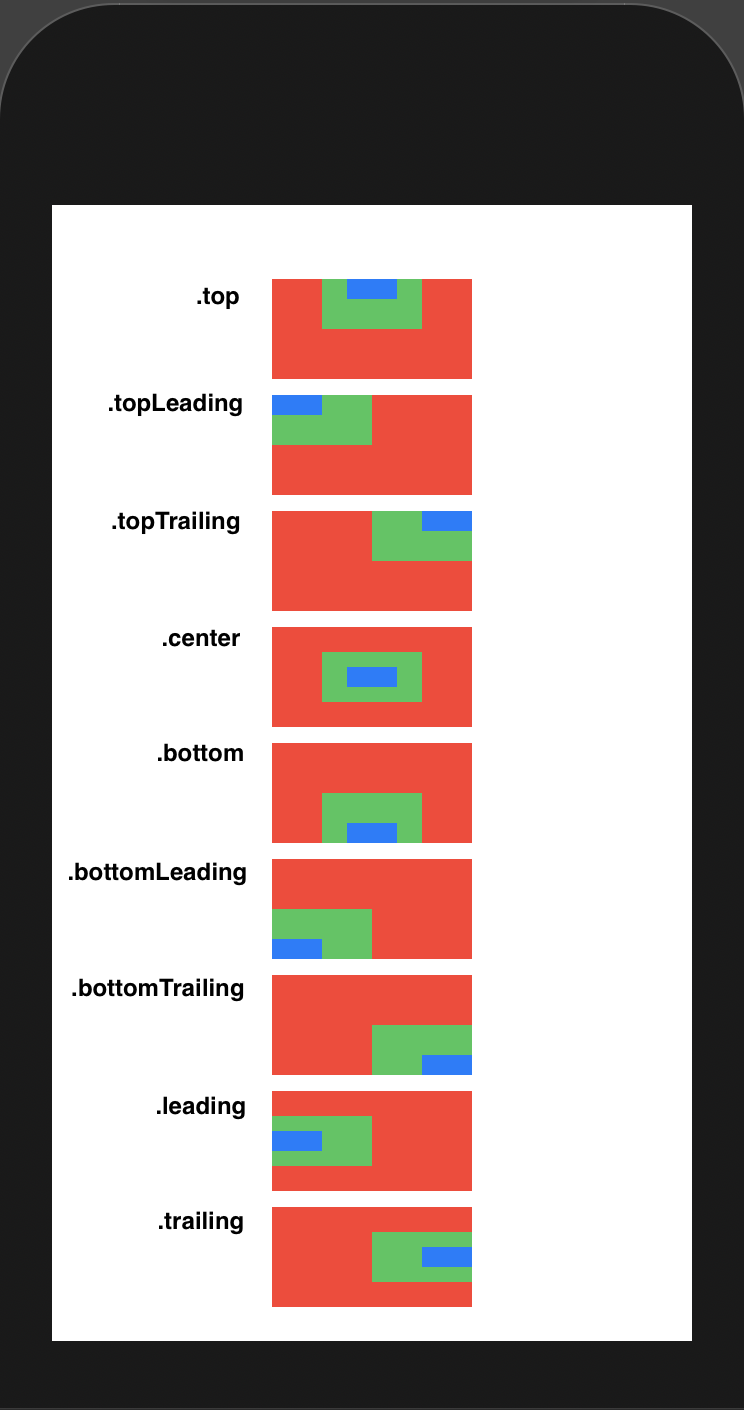
VStackと組み合わせて、それぞれの配置の仕方の例を示します。
数が多いので一纏めにして紹介します。
配置の仕方は赤色、緑色、青色の図形を順番に重ねて配置しています。
import SwiftUI

struct ContentView: View {
    var body: some View {
        VStack{
            ZStack(alignment: .top) {
                Rectangle()
                    .fill(Color.red)
                    .frame(width: 100, height: 50)
                Rectangle()
                    .fill(Color.green)
                    .frame(width: 50, height: 25)
                Rectangle()
                    .fill(Color.blue)
                    .frame(width: 25, height: 10)
            }
            ZStack(alignment: .topLeading) {
                Rectangle()
                    .fill(Color.red)
                    .frame(width: 100, height: 50)
                Rectangle()
                    .fill(Color.green)
                    .frame(width: 50, height: 25)
                Rectangle()
                    .fill(Color.blue)
                    .frame(width: 25, height: 10)
            }
            ZStack(alignment: .topTrailing) {
                Rectangle()
                    .fill(Color.red)
                    .frame(width: 100, height: 50)
                Rectangle()
                    .fill(Color.green)
                    .frame(width: 50, height: 25)
                Rectangle()
                    .fill(Color.blue)
                    .frame(width: 25, height: 10)
            }
            ZStack(alignment: .center) {
                Rectangle()
                    .fill(Color.red)
                    .frame(width: 100, height: 50)
                Rectangle()
                    .fill(Color.green)
                    .frame(width: 50, height: 25)
                Rectangle()
                    .fill(Color.blue)
                    .frame(width: 25, height: 10)
            }
            ZStack(alignment: .bottom) {
                Rectangle()
                    .fill(Color.red)
                    .frame(width: 100, height: 50)
                Rectangle()
                    .fill(Color.green)
                    .frame(width: 50, height: 25)
                Rectangle()
                    .fill(Color.blue)
                    .frame(width: 25, height: 10)
            }
            ZStack(alignment: .bottomLeading) {
                Rectangle()
                    .fill(Color.red)
                    .frame(width: 100, height: 50)
                Rectangle()
                    .fill(Color.green)
                    .frame(width: 50, height: 25)
                Rectangle()
                    .fill(Color.blue)
                    .frame(width: 25, height: 10)
            }
            ZStack(alignment: .bottomTrailing) {
                Rectangle()
                    .fill(Color.red)
                    .frame(width: 100, height: 50)
                Rectangle()
                    .fill(Color.green)
                    .frame(width: 50, height: 25)
                Rectangle()
                    .fill(Color.blue)
                    .frame(width: 25, height: 10)
            }
            ZStack(alignment: .leading) {
                Rectangle()
                    .fill(Color.red)
                    .frame(width: 100, height: 50)
                Rectangle()
                    .fill(Color.green)
                    .frame(width: 50, height: 25)
                Rectangle()
                    .fill(Color.blue)
                    .frame(width: 25, height: 10)
            }
            ZStack(alignment: .trailing) {
                Rectangle()
                    .fill(Color.red)
                    .frame(width: 100, height: 50)
                Rectangle()
                    .fill(Color.green)
                    .frame(width: 50, height: 25)
                Rectangle()
                    .fill(Color.blue)
                    .frame(width: 25, height: 10)
            }
        }
    }
}
プレビューの結果は次のようになります。
それぞれの配置の仕方によって、図形の揃い方が変わっているのが分かります。
3. Viewの組み合わせ
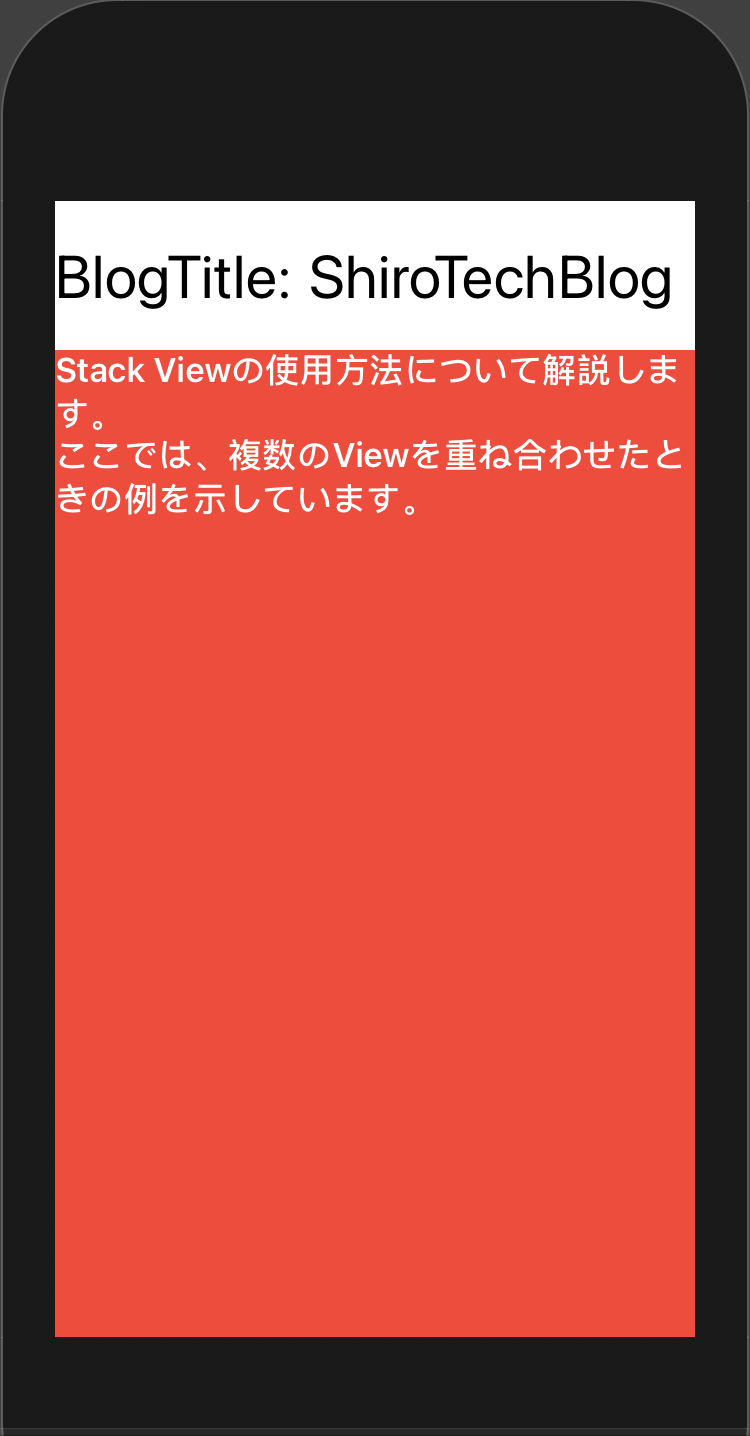
これまで説明した内容を踏まえて、VStack,HStack,ZStackを組み合わせたViewの配置の例を示します。
import SwiftUI

struct ContentView: View {

    var body: some View {
        VStack(alignment: .leading){
            HStack{
                Text("BlogTitle:")
                    .font(.largeTitle)
                Text("ShiroTechBlog")
                    .font(.largeTitle)
            }
            ZStack(alignment: .topLeading){
                Rectangle()
                    .fill(Color.red)
                VStack(alignment: .leading){
                    Text("Stack Viewの使用方法について解説します。")
                        .foregroundColor(.white)
                        .bold()
                    Text("ここでは、複数のViewを重ね合わせたときの例を示しています。")
                        .foregroundColor(.white)
                        .bold()
                }
            }
        }
    }
}
VstackでHStackの内容とZStackの内容を左寄せに垂直に配置しています。
ZStack内では赤色の図形とVStackの内容が左上部で揃うように配置して、GUIの中で文章部分を作っているようなViewとしています。
プレビューは次のようになります。
4. 子Viewの制限について
最後にStack View内に配置出来る子Viewの数の制限について簡単に触れます。
一つのStack内に配置出来る子Viewの数は最大で10個と決まっています。
それ以上並べるとエラーになってしまうので気を付けてください。
StackViewの中に配置したStackViewの中には
新しく10個のViewを配置することが出来ますので
上手くStackViewを組み合わせてViewを配置していくことが重要になります。
5. まとめ
今回は複数のViewの配置について解説してきました。
Vstack,HStack, ZStackはSwiftUIでアプリ開発をする上で重要な要素となるのでしっかり覚えましょう。
✔︎ VStack、HStack、ZStackの使い方
✔︎ それぞれのalignmentの種類と使用例
✔︎ 複数のViewの組み合わせ方
✔︎ StackView内部の配置上限について


コメント